Friday, November 25, 2011

Seven dollar art.

I love the look of art mounted on the outside of a bookcase.
I wanted to create this look on the shelving unit in my daughter's nursery. I found this molded plastic frame at an estate sale for $2 (half off day!) but as soon as I brought it home I knew the gold wasn't going to work for me. The flower print had to go as well.
I picked up a print from thelittletiny at the Bijou Market last weekend for $5. It was originally 8x10", but the writing portion fit perfectly into my roughly 5x7" frame. I love the sentiment of the print.

To paint the frame I had to first tear off the paper backing. I don't know how old it is but there was a $25 price sticker from JCPenney on the back. Pricey, right? Once I removed the old art I could use it as a pattern to cut my new print.

With the print removed I popped out the glass and painted the frame with a bottle of acrylic paint I already had on hand. It took three coats to cover evenly. Then I cleaned and replaced the glass, put in my new print, replaced the backing and voila. Seven dollar art.
To mount the frame on my bookcase I used Command picture hanging strips. I was concerned about how to hang the art since my infant will soon be a toddler and I wanted it to last (and not fall on her head). I've heard great reviews of this product, so I gave it a go and I cannot believe how sturdy the frame is with these strips. They are like a stronger form of velcro, and they are suppose to remove cleanly from both surfaces. Who knows how well they will work on IKEA veneer, but it was worth a try. Here's one more shot for perspective:I love how it turned out. It has been three days now and the frame and strips have not budged a bit.

Saturday, November 19, 2011

How to make a doily mobile.

One of the projects I took on for our nursery was a mobile to hang over the crib. By the time I got to this project the budget for the room was used up, so I wanted to make something on the cheap. After searching the internet for inspiration, I decided to combine several ideas and make something out of paper doilies. Here is my how-to:
1. Gather your supplies.
-paper doilies
-rubber gloves
-food coloring
-cooking sheet with rim
-wax paper
-paper towels
-rubber cement
-ribbon (two widths)
-embroidery hoop
-craft glue

2. Fill the pan with enough water to cover the doily only. Add about 20 drops of food coloring. I decided to make colors that would match the rug in the nursery.

3. Submerge each doily for about 30 seconds. You will need four doilies of each color that you choose.

4. Gently remove the doily. They are very fragile and can tear easily when wet. Lay out to dry, blot immediately with a paper towel. Dry overnight.
5. Fold each doily in half, making sure to match the pattern around the edge. Glue two halves together with rubber cement.
6. Lay out your glued doilies and cut a thin piece of ribbon to hang each from the embroidery hoop. Stagger the lengths or your doilies will bump into each other.
7. Glue on the other set of folded doilies to its matching color, making sure to glue the thin piece of ribbon in the middle.
8. Wrap three pieces of wide ribbon (evenly spaced) around your embroidery hoop. Secure using craft glue. Tie in a knot to hang your mobile from the ceiling.
9. Secure each doily ball to the hoop in the same fashion. Ta-da! Your mobile is complete.

Total cost for this project was $13, and I was left with half a package of doilies when I was done.

Thursday, November 17, 2011

How to make a fabric letter.

I've always loved these pretty fabric covered letters that Anthropologie carries.I found this great tutorial at Prudent Baby and made one of my own for the nursery. Total cost for supplies was $6, and that includes a 12" tall letter. Growing up in Seattle, where we had earthquakes almost annually, I'm totally nervous about hanging anything over the crib. This soft letter was all I could handle. :)

Thursday, August 25, 2011

Baby girl's nursery.

I apologize for the long absence; our baby girl has arrived and I suppose these pictures are better late than never.
The nursery was also featured on Apartment Therapy's Ohdeedoh site. I shared a little bit of information on the room, as well as sources for many of the products. You can view the room here.

Wednesday, June 29, 2011

Shades of gray.

Back when our home office was upstairs we painted it a light gray, and we love it so much that when we converted the room to a nursery we chose to keep the same color. For months we tried swatch after swatch, each time determining the color to be too blue, too purple, too dark, etc. I wanted a light, warm shade of gray, like in this image.
I finally found a gray with the perfect undertones, but when I painted it on the wall it was too dark. At the home improvement store I showed my swatch and asked for a lighter version, and learned that the lighter colors on the same card are not necessarily just less saturated versions of each other. For example, the lighter shade of gray on my card used much more blue. So they simply whipped up a sample with only 50% of the formula (i.e. more white overall) and it is perfect! Here is Behr's "Dolphin Fin" at full color and the 50% solution.
When we decided to paint the basement a light gray (almost white) we went back to our tried and true "Dolphin Fin", this time having a solution of only 25% color mixed. It gives a subtle contrast to the white trim but keeps the space light and bright.

Friday, June 24, 2011

Take Five Friday.

It's been a long time coming, but today I have another amazing blogger to interview in my "Take Five Friday" feature. You can catch up with past interviews here.

Joi, of Nuestra Vida Dolce

Joi started her blog as a space to keep decor inspiration and update family and friends. She has some super creative ideas, and together with the help of her husband David they complete some pretty amazing transformations. She also does this great feature called "What's Good in Your 'Hood" where she scours Craigslist and finds awesome furniture and decor in your town.

What advice can you give readers on getting started when decorating a new home?
Take your time. It is so tempting to "finish" a room that many people often buy things they don't love just to have a room "complete". I think the more a person shops around and figures out their true style, they will be happier in the long run.
(joi's living room)

Who is your favorite interior designer?
At the moment, it is Emily Henderson from HGTV's Secrets From a Stylist. I can totally relate to her vintage-modern eclecticism and I feel like what she creates is so fun and livable.

What are your favorite online resources for all things home-related?

I love good design that is also affordable. My quick go-to stores are Overstock.com, Urbanoutfitters.com, Fabric.com, CB2.com, and WestElm.com
(joi's master bedroom)

What is your favorite piece of furniture in your own home, and why?
Our dining room table. I envisioned what I wanted and my father-in-law built it. It is very sentimental to me.
(joi's kitchen)

What has been your most successful DIY project?
My favorite project was painting the kitchen cabinets white! It was one of the first things we did and we were so proud of ourselves!

Thanks to Joi for taking five out of your busy schedule to participate in this feature. I love her colorful and creative home!

Monday, June 20, 2011

A new addition.

Now that the basement is complete and the office has moved to its new home, it is time to begin work on the third bedroom. This project is a very exciting one for us, as we have been converting the room into a nursery! Normally the way the hubby and I decorate is to use what we already have first, then fill in with things we find along the way. That way we end up with a room full of things we love that have been collected over time. The nursery proved more challenging because we had to start from scratch. I had a million ideas running around in my mind, but for me it was totally overwhelming to try and design a room from the ground up. The plan was for the room to have a "vintage modern" aesthetic, and for the walls to remain gray with white furniture. The room started to come together after we found this beautiful rug:
I'll share the rest of the plan and progress with you next week!

Monday, May 16, 2011

Making it your own.

A couple of weeks ago Apartment Therapy featured a tour of the beautiful home of textile designer Amy Butler and her family. The chandelier in their living room caught my eye.
This close-up photo reveals that it appears to be the MASKROS pendant light from IKEA. If not, it is a nearly identical fixture.
The IKEA version can only be purchased in white, but it is made of plastic so a little bit of gold spray paint later you'd have Amy Butler's gorgeous light. The best part is that now they are selling the light fixture in two different sizes (it was previously only sold in a 36" diameter, which is huge for most homes).

Monday, May 9, 2011

Storage for the EXPEDIT.

Is anyone else fed up with the over-priced storage options IKEA sells for their line of EXPEDIT bookshelves? They start at $13, and yes they fit perfectly but they are poorly made and lack any style. I went on an internet hunt searching out other options, so I hope someone else will benefit from my hard work. Here are my top finds:

1.

Love the look of wire locker baskets. You can buy them vintage on etsy for around $20 each, or new from this site for $13 each. Plus after doing a quick search for company coupon codes I found one for 10% off and another for free shipping.

2.
These Target baskets come in a set of three for $43. I'd love to have a new liner made in a cute fabric or with a ruffled edge like these from Restoration Hardware.

3.
Authentic dairy crates make a cute and sturdy option, especially in all of the fun colors at The Container Store. The reviews raved about their durability, and for $10 each you can't go wrong.

4.
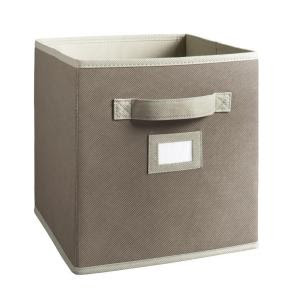
These fabric drawers from Home Depot are only $7 each, and come in about 15 different colors and patterns. The OCD in me loves the slot for writing what's in each basket.

Friday, May 6, 2011

Sunroom inspiration.

This past weekend we walked into our local Restoration Hardware store to see what's new. We loved the wall treatment the brand is using for their summer display.
After inspecting it closer we found out that the greenery is faux boxwood mats. They are simply zip-tied together on the back side, and then staple gunned to the wall. The hubby and I were simply inspired. We would love to add this treatment to our sunroom, but hit a snag when we realized the most inexpensive mats we can find are $16 per square foot. Yikes!

Sunday, May 1, 2011

Calypso for Target.

I have yet to mention my love for Target's designer collaborations on this blog. Like every other suburbanite woman in the country Target is my go-to resource for all things home related. Last year when they released the Liberty line it was a good day, and I continue to find awesome products from their line with DwellStudio. So today being the release of their newest "lifestyle" collaborative with the company Calypso St. Barth I thought I'd share a few of my favorite things from the line.
I do love a pretty scented candle that also adds to the decor of a room.
We own a vintage pouf that is often a conversation piece in our home. And we love it. Do I need more than one? Does anyone?
Someone reading this with a toddler needs to go buy her a tunic ASAP. But I digress...
This elephant teapot would be such a quirky addition to someone's kitchen. Just not mine, because I really have no more spare space on my counters.

Thursday, April 14, 2011

On to the fun part.

The work is complete on our basement, and now we get to move on to the decorating. Hooray! We already own most of the furniture that will go in the new spaces, so it should be a pretty quick transition. Our decorating plan involves making this a functional family space. We plan to bring in lots of color, and to bounce the light around with a strategically placed mirror. I think on my next basement post I'll do a fun before, during, and after set of photos. For now, here's how we look with paint and carpet!
Welcome!
Come in to the office... I know the light is terrible. We've had several dreary days in a row so this is as good as this little room could get.
Let's head back out into the family room...
If you look carefully you can still spot some painter's tape from our touch-ups. More importantly you can see our pretty wood counter top and floating shelves.
The fireplace turned out exactly as we'd hoped, which is lucky considering no one would give us a guarantee that it could be painted. All it took was some Gripper primer and two coats of paint. For those of you that are curious, here is the paint color breakdown:

trim: Behr Ultra Pure White in semi-gloss
walls/ceiling: Behr Dolphin Fin at 25% solution in eggshell
fireplace: Behr Trail Print in satin
Related Posts Plugin for WordPress, Blogger...